Tuesday, 27 December 2016

Walnut Cappuccino Birthday Cake

I first made this cake for my friend Alice's birthday earlier this month, she is something of a coffee fiend, and thus I created this concoction for her, a lusciously moist coffee-flavoured sponge with a coffee whipped cream frosting. The frosting will be more or less set depending on how much coffee you add, I choose to sacrifice firmness for a caffeinated hit but you may prefer a firmer icing.

Start by making your sponges, this recipe makes quite a lot of cake, enough for ten people to each have a hefty slice, if you are making this for a significantly more intimate crowd then you can halve the recipe. I make and cook each sponge mixture separately as my kitchen isn't large enough to make both at the same time, but this isn't obligatory.

Start by making a small cafetiere of very very strong coffee, leave it aside to cool. Cream the butter and sugar together with a mixer until smooth, whisk the eggs and add them gradually to the mixer with a little flour at a time. Fold in the rest of the flour and the baking powder to the mixture and add half of the coffee. Divide into two sandwich tins and bake until browned and cooked through. Turn the cakes out onto a wire rack to cool.

To make the frosting whip the cream until stiff and thick, I often use a food processor for this, mostly because I'm lazy but a hand mixer will also do the trick. Add the rest of the coffee and process until the cream has turned a smooth taupe. To this add the icing sugar and mix until smooth.

When the cakes have cooled place the first on a plate and cover the top with frosting, carefully place the other cake on top and cover the whole thing with icing using the back of a spoon. Roughly chop the walnuts and sprinkle them over the top and the sides of the cake, refrigerate until ready to serve.

ingredients

for the cake
300g granulated sugar
300g vegetable shortening
6 eggs
300g plain flour
2tbsp baking powder
4 tablespoons ground guatemalan coffee
250ml hot water

for the icing
100ml whipping cream
400g icing sugar
100g walnut pieces

Monday, 26 December 2016

Salted Caramel Pancakes

Apologies for my absence from the airwaves recently, being a finalist is more difficult and time-consuming than I had imagined, thankfully I made it out without killing myself or anyone else, and retaining my sanity.

This is a fantastic dish, and though it tastes luxuriously decadent it is woefully simple. I'm absurdly proud of having made this without burning myself which is a tragically common occurrence when making caramel. You can adjust the quantities of salt if you wish for it to be more or less salty, I use french fleur-de-sel for this dish, which is traditional in France. Fleur-de-sel is harvested in Guérande, in Brittany, and it is formed when moving water evaporates leaving salt crystals with a characteristic floral shape. If you can't find these then sea salt flakes can be used.


Start by whisking all your pancake ingredients together in a large glass bowl, cover it with a tea towel and leave it to rest while you make your caramel sauce.

For the sauce, place the soft brown sugar in a saucepan and heat over a high heat stirring with a wooden spoon until the sugar has melted to a pale brown amber, continue to heat, stirring until you have reached your desired darkness, the darker the caramel the more bitter it will be, take care that the sugar doesn't burn. Add the cubed butter and stir it into the sugar until it melts.

The sugar and the butter will start to separate, use a whisk to combine them until smooth and bubbling, remove from the heat and add the heavy cream, it will bubble ferociously, return the pan to the heat and whisk it until smooth. Some of the sugar may resolidify, heat it for a few minutes on high until it has all melted and is smooth. Leave it to cool then add the salt and mix. When it has cooled further pour it into a sauce boat.

Cook your pancakes, heat a little vegetable oil in a large heavy-based frying pan and add a ladleful of the pancake batter, cook it for a few minutes on each side, flipping it with a spatula.

Serve the pancakes folded and topped with lashings of the salted caramel sauce.

ingredients:

for the pancakes
100g plain flour
1 large egg
300ml milk
sunflower oil for frying

for the sauce
100g soft muscovado sugar
45g cubed unsalted butter
100ml single cream
1/2 tbsp fleur de sel de Guérande

Tuesday, 27 September 2016

Fig Roll Danish

This is part five of our Great British Bake Off Bakealong, and I must say that these bakes are getting more and more difficult. This weeks challenge was danish pastries, and whilst I adore a flaky danish, they aren't easy to make. These danish pastries are based on the flavours of a fig roll, and they are really rather good, and more than a little moreish.


Start by making your dough, mix the dry ingredients in a bowl and add the water, mixing with a fork to a smooth dough. Knead thoroughly and leave to rise until doubled in size.

When the dough has risen knock it back and roll it out to a 20cmX60cm rectangle. Roll out your butter between two sheets of greaseproof paper, place the butter in the centre of the dough and fold each side of the dough over the butter. Wrap the dough in clingfilm and place it in the fridge for 30 minutes.


Remove the dough from the fridge and roll it out again to a 20X60 rectangle, fold the edges into the middle again and return to the fridge, repeat this step three timed resting in the fridge between steps and finally leave to rest and rise in the fridge for 8 hours.

To make your filling process 8 soft and squidgy figs in a food processor with a splash of water and a teaspoon of soft brown sugar. Add a teaspoon of vanilla extract and process again until smooth.

Remove the pastry from the fridge and roll it out to a 5mm thickness, cut it into rectangles, cut each edge of the rectangle into strips as in the picture below.


Spoon a little of the fig mixture into the middle of the pastry and cross the strips over the top, alternating until all of the mixture is covered. Repeat until all the pastry is used up. Brush liberally with beaten egg and bake in a medium hot oven for around 20 minutes until golden and flaky.

ingredients
for the dough
500g strong white bread flour, plus extra for dusting 
10g salt, plus a pinch for the egg wash 80g caster sugar 10g instant yeast 300ml cool water 300g chilled unsalted butter1 medium egg to glaze

for the filling
8 dried figs
1tbsp brown muscovado sugar
1tsp vanilla extract
water

Friday, 23 September 2016

Baked Camembert Tear & Share

Whilst a baked camembert by itself is wonderful, it is nothing without a wonderful loaf of bread to go with it, and considering that my parents live in the middle of nowhere in the french countryside, this means that if I want decent bread without a months notice, then I have to make it myself.


The recipe given here makes something of a centrepiece which looks wonderful, however, this dough will also make a wonderful baguette if you shape it differently, should you not wish to faff around as I have.

Start by making your bread dough, add the dry ingredients to a bowl and stir to combine, add the water and mix with a fork until combined into a smooth dough, scrape out onto a floured work surface and knead for five minutes, return to the bowl and cover with a cloth, leave in a warm place to rise until doubled in size. When risen knock back on a floured work surface, with your hands form the dough into a long sausage, and join the ends to make a ring big enough for the camembert box to fit into the middle.

Using scissors cut slits in the edge of the ring almost to the centre without splitting the ring, wrap an empty camembert box in aluminium foil and place it in the centre, place the ring onto a baking tray and leave in a warm place to rise until almost doubled in size.

When risen brush the top with beaten egg and bake in a hot oven for 15 minutes. Remove from the oven and carefully extract the camembert box from the centre. Return to the oven for a further five minutes.

Meanwhile, remove the camembert from its box and remove the plastic wrapping, return to the box and place on a baking tray, lightly cut a cross in the rind on the top, and push two peeled cloves of garlic into the cheese, bake on a medium heat for 10 minutes until fully melted.

Put the bread on a board and place the cheese, still in its box, in the middle as in the picture. Add a smearing of chutney and serve, with a glass of red wine.

ingredients

for the bread

150ml water
225g white bread flour

1 tsp salt
2tsp dried yeast

1 round camembert
2 cloves garlic, peeled

chutney, to serve

Friday, 16 September 2016

Swiss Chard and Ricotta Yorkshires

This is the fourth part of my Great British Bake Off Bakealong, and this week I found the signature bake rather fascinating, I have written previously about by adoration for homemade Yorkshire puddings, and indeed I have eaten them alone for lunch with just a little gravy. I also have a loathing of bought frozen Yorkshire puddings, given how simple they are to make, and a firm belief that the puddings should be crisp, rather than pillowy or fluffy.


These puddings are filled with sauteed swiss chard and ricotta and they make a delectable dinner when served with just a light green salad, you could also make them as an hors d'ouevre if you use a smaller pudding tin. I must confess that I actually managed to start a small fire whilst making these, I strongly believe that a good inch of oil is needed in each tin to achieve a crisp rise, unfortunately, I was a little too overzealous in my use of oil and some of it overflowed into the floor of the oven where upon contact with the burner it promptly burst into flame. Although I did nearly burn my house down and probably scarred my cat in the process after tasting these I can confirm that it was definitely worth it.

About an hour before you plan to actually start cooking make the batter, crack four eggs into a bowl and add the milk and whisk, sift in the flour and season with salt and pepper, whisk until free of lumps and pour it into a jug, cover with cling film and place in the fridge.

When you are ready to cook the Yorkshire puddings fill the bottom of a pudding tin with sunflower oil and place in a very hot oven until it starts to smoke, open the oven door and pour the batter into each well until there is a good amount of batter, but it is still covered by oil, close the door and cook for 20 minutes, resist any temptation to open the oven door  until they have finished cooking. I also advise that you don't stare wistfully at them through the oven door, they can be very temperamental and have a tendency to get stage fright.

Wash the swiss chard and chop finely discarding the tough stalks, sautee with a little sunflower oil for five minutes until tender. Empty the ricotta into a large bowl and mash with a fork, add an egg yolk and a grating of fresh nutmeg and mix, fold in the cooked chard.

Fill each Yorkshire pudding with a spoonful of the chard and ricotta mixture and place on a baking tray, return to a medium oven for five minutes for the filling to set and for the Yorkshire puddings to crisp up and serve.


ingredients

     for the puddings
4 eggs
140g plain flour
200ml semi-skimmed milk
sunflower oil

     for the filling
1kg chard
200g ricotta
freshly grated nutmeg
1 egg yolk
sunflower oil

Wednesday, 14 September 2016

Moroccan Hummus

If you live in the Britain chances are you will probably have a wide range or hummus' available easily, and thus have probably never even considered making your own. Yes I appreciate that for many of you making something so easy to purchase might seem slightly pointless but firstly the hummus that you buy isn't nearly as good as when you make it, and secondly all the ingredients used here are non-perishable and thus you can always have the necessary ingredients in your pantry should you ever desire hummus even at the most inconvenient of times.


Start by placing your chickpeas in a food processor, I use a small processor that attaches to a stick blender though should you wish to double up or even triple up the recipe you can, of course, use a standalone food processor. Add two cloves of garlic and a large slug of olive oil and process until smooth, you may need to scrape down the sides of the processor with a spatula, season to taste with sea salt flakes and process again, the texture may be too thick for your liking, you can thin it slightly with some of the liquid drained from the can of chick peas. Add a heaped teaspoon of ground turmeric and process again, and serve.

ingredients

1 small can chick peas
2 cloves garlic
olive oil
sea salt flakes
2 tsp turmeric

Tuesday, 13 September 2016

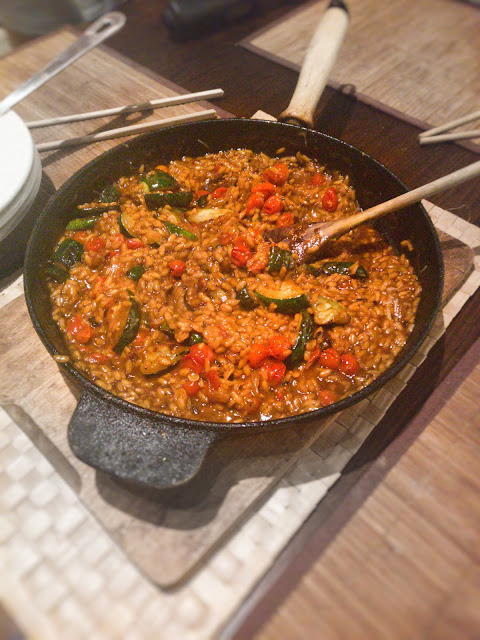
Zucchini Tomato Risotto

I have published risotto recipes on this site before but never one quite like this, my mother first introduced to me this concept and I rather like it, this dish uses slow roasted tomatoes and tomato passata, added to the rice just before it has finished cooking to add sweetness, and it's truly a revelation, my only stipulation with this recipe is that you must make it in summer, tomatoes grown in a greenhouse in December simply won't provide enough delicate sweetness.


Around an hour or so before you wish to eat drizzle some olive oil into the bottom of a glass ovenproof dish and add the cherry tomatoes, add another drizzle of olive oil and a pinch of sea salt flakes to the tomatoes and place them in a medium oven for an hour or until they have shriveled.

Dice a white onion and heat some vegetable oil with a knob of butter in a large heavy-based frying pan. Fry the onion until translucent and soft and add a teaspoon of ground coriander. Make up your stock in a jug. Add the arborio rice and turn in the oil until it is shiny and coated. Brown lightly and add a splash of vermouth. Cook off the alcohol until the pan is relatively dry and no longer smells alcoholic. Add the stock a splash at a time until it has all been absorbed and the rice is still firm, but tender.


Meanwhile, dice the courgette and fry it lightly in butter until it has browned. When the rice is cooked add the passata and stir, allow to reduce slightly then add the grated parmesan and stir until it has melted. Add the courgette and the roasted tomatoes and combine. Serve garnished with chopped coriander leaves.

ingredients

1 medium white onion
300g arborio rice
vegetable oil
small knob unsalted butter
small splash vermouth
500ml vegetable stock
50g grated parmesan
150ml tomato passata
100g cherry tomatoes
2 courgettes
small pinch sea salt flakes

Monday, 12 September 2016

Greek Salad Plait

For the third part of my Bake Off Bakealong I cheated slightly, though I intended to do the signature bake every week, no questions asked, I found myself thoroughly uninspired by the signature bake, and decided instead to do a filled plaited loaf, like the showstopper, and to use a savoury filling instead of a sweet one, given that my vices are usually savoury.

This loaf is inspired by the flavours and ingredients of a greek salad, salty black olives, crumbly feta cheese and squidgy sun-dried tomatoes, with a lick of olive oil to top it all off.

Start by making your bread dough, add the water and olive oil to a bowl and sift the flour over the top, add the sugar and salt and make a well in the top of the flour, add the dried yeast and mix with a fork until you have a smooth dough, turn the dough out onto a floured surface and knead for at least five minutes, return to the bowl and cover with cling film. Leave to prove until doubled in size.

While the dough is rising pit and chop the olives and place them into a bowl, do the same with the sun dried tomatoes, and finally, crumble the feta into another bowl.

When risen knock back the dough onto a floured surface and split into three even pieces. Take the first and stretch it out so that it looks like a small pizza, add the olives and knead until the olive is distributed evenly throughout the dough. Do the same for the other two pieces of dough with each of the other fillings, and then stretch out each piece of dough until it resembles a long fat salami.

Finally press the three pieces of dough together at one end and plait, when done plaiting press the ends together and tuck them under the loaf, transfer to a lined baking sheet and cover with a tea towel, leave to rise for a half hour and then place in a hot oven for 30 minutes until the bottom sounds hollow when tapped, brush with olive oil and serve with a good olive oil for dipping, and a glass of red wine, obviously.

Ingredients

for the dough
210ml water
375g flour
2 tbsp sugar
1 1/2 tsp salt
4 tbsps olive oil
1 1/2 tsp dried yeast

for the fillings
small handful black olives
small handful sun-dried tomatoes in oil
1/3 block of feta
olive oil

Friday, 9 September 2016

Orange Ginger Biscuits

This is part two of my Bake Off Bakealong, and this week was biscuit week, I will admit that biscuits aren't my strong suit, but these were inspired by an orange and ginger tea I used to drink years ago when I was still in school.


cream the unsalted butter and caster sugar together until light and smooth. Crack in the egg and vanilla extract and beat. Add the zest of an orange and mix until combined. Add the flour, salt and ground ginger and fold until it is all mixed in and a dough has formed. Wrap in cling film and chill for an hour until firm.

Remove from the fridge and roll out thinly, cut into rounds with a cookie cutter and bake on high for 15 minutes or until golden and crisp. Transfer the biscuits to a cooling rack to cool completely before icing.

Juice the orange and measure 8 tablespoons of icing sugar into a bowl, add the orange food colouring and a tablespoon of juice and mix until smooth, you may need to add more juice if it is too dry, though the icing should be smooth and viscous, Using a spoon cover the tops of the biscuits with orange icing and leave in the fridge for the icing to harden completely before serving.

ingredients

for the biscuits
90g unsalted butter
100g caster sugar
1 egg
1/2tsp vanilla extract
200g self-raising flour
pinch salt
zest of 1 orange
1tbsp ground ginger

for the icing
8tbsp icing sugar
juice of 1 orange
1/2tsp orange food colouring

Wednesday, 31 August 2016

Marmite Cheese on Toast

Yes. Yes, I am giving a recipe for cheese on toast, though cheese on toast might seem like a pretty self-explanatory dish, I feel incredibly passionate about this variation, though this might just be the easiest recipe I have ever shared.


I have written here before about my passion for marmite, I adore salty foods much to the chagrin of my father, and I even own a book of recipes, all of which use marmite, I have also previously shared a recipe for marmite macaroni which I urge you to try if you are as passionate for this viscous salty elixir.

The inspiration for this recipe is twofold, firstly it's a variation on a favorite snack of my friend Morgans, and secondly it takes me back to my childhood when my favorite dinner was a baked potato split in half and spread thickly with a coronary-inducing amount of marmite wth a melting slice of red Leicester on top.

Start by toasting your bread, then spread it with butter and then marmite, cover with melted cheese and place under a hot grill for five minutes, until the cheese has melted and started to brown, remove from the grill and devour.

ingredients

bread
butter
marmite
grated cheddar

Monday, 29 August 2016

Mojito Drizzle Cake

This is part of a new series I've started here on Philips Journal. Based on the greatest show on television, The Great British Bake Off which just returned to our screens after a too long break. This week the bakers made drizzle cake, and seeing as baking isn't my greatest passion, I decided to challenge myself every week to make my own version of the signature bakes. This week was drizzle cakes, so here is my version.


This is based on the flavours of a mojito, I've added peppermint extract and lime zest to the sponge, and used lime juice for the drizzle.

Start by making your sponge, cream the softened butter and caster sugar together until smooth, add the eggs one at a time and stir gently. Add a teaspoon of peppermint extract and the zest of a lime and mix. Sift in the flour a little at a time and fold until smooth, spoon into a greased loaf tin and bake at 220C for 45 minutes, or until a skewer inserted into the cake comes out clean.

While the cake is cooking squeeze the juice of 2 limes into a saucepan, add 3 tablespoons of sugar and swirl the pan to make a syrup, a few minutes before the cake is ready heat gently until the mixture is hot, but not boiling. Remove the cake from the oven and prick all over with a skewer. Drizzle over all the syrup and leave in the tin to cool.

ingredients

225g unsalted butter
225g self raising flour
300g caster sugar
4 eggs
2 limes
1 tsp peppermint extract

Monday, 22 August 2016

Peanut Butter Tollhouse Cookies

I have a sick obsession with peanut butter which I almost certainly inherited from my mother. My mother was known for eating it from a teaspoon when pottering around the kitchen, and when asked what she was eating she would promptly try to swallow the entire spoonful whole, and end up looking like the snake from The Jungle Book in the process.


These manage to quench my desire for peanut butter quite nicely, though I suspect that my father would abhor them, he has a loathing of peanuts, perhaps understandable given how many different varieties of urine bar nuts allegedly contain.

These cookies are flourless, and thus this recipe has the bonus of being gluten free. Start by measuring your smooth peanut butter into a large bowl, add the sugar, salt, and baking powder and mix vigorously with a wooden spoon until the mixture is smooth. Add an egg and a teaspoon of vanilla extract and gently stir them into the batter. Fold in the chocolate chips. Line a baking sheet with greaseproof paper and place heaped teaspoons of the mixture onto the paper spread well apart. Bake at 180C for 12 minutes until they have spread and crisped slightly. Leave them on the tray for 10 minutes until they have cooled and then gently transfer them to a wire rack to cool fully.

ingredients:

225g smooth peanut butter
100g molasses sugar
1/2 tsp baking powder
pinch sea salt flakes
1 large egg
1 tsp vanilla extract
75g chocolate chips

Saturday, 20 August 2016

Corn Chowder

I have a complicated relationship with soup, I adore it, but whenever I make it I always end up making enough for the entire street and eating it for a week afterwards. The quantities shown here are enough for one large bowl, feel free do multiply the quantities if you wish to make more.


Start by putting your sweetcorn, defrosted under boiling water and drained in a food processor. Add a bruised clove of garlic and a chopped spring onion and blitz until smooth. Transfer to a large saucepan and cover with 500ml of hot vegetable stock. Mix with a wooden spoon and simmer for 10 minutes.

While the soup is simmering scatter a small handful of tortilla chips on a baking tray and cover with liberal amounts of grated cheese, place in a hot oven for four or five minutes until the cheese has melted and the tortilla chips have started to brown. Ladle the soup into bowls and cover with the tortilla chips, and devour.

Ingredients

250g frozen sweetcorn
1 clove garlic
1 spring onion
500ml vegetable stock
small handful tortilla chips
40g grated cheese

Monday, 15 August 2016

Beef Stroganoff

This dish was first cooked in 19th-century Russia by Count Pavel Stroganoff, a dignitary of Alexander III. It was subsequently popularised in America in the 1950's where it was often served with pasta, this version is served with a mound of buttery rice.


This is a beef stroganoff, however, you can make a vegetarian version if you so wish, simply by omitting the beef strips and using more mushrooms. For the meat, I use ready diced beef which tends to be a bit cheaper than buying a steak and then slicing it, you can. of course, use any cut of beef you like, if you wish to be a little more extravagant.

Start by chopping a medium sized white onion finely, add a large knob of butter to a frying pan with a little vegetable oil and melt on a medium heat, add the onion and fry until it is translucent and slightly browned, add some finely sliced mushrooms and cook for five minutes. Transfer from the pan to a bowl and slice your beef into thin strips if you haven't gone down the lazy prepared route as I have. Cook your beef for a few minutes until cooked through but still tender.

Return the onions and the mushrooms to the pan and add the creme fraiche and the mustard, stir until combined, add a pinch of paprika and nutmeg and serve, on a bed of rice.

ingredients

250g beef (see above)
50g button mushrooms
4 tbsp creme fraiche
1/2 tsp wholegrain mustard
pinch paprika
pinch nutmeg
large knob butter
1 tsp vegetable oil
salt & pepper

Sunday, 14 August 2016

Prawn Curry Soup

I recently experienced somewhat of a craving for curry, and I'm not referring to the fluorescent orange tandoori found in most middle England towns, but to something rather softer, and less harsh, more fragrant and aromatic than fiery and spicy.


Whilst curry is wonderful it can often get boring, so I created this dish to use similar flavours as a curry, but without needing rice as an accompaniment, here I serve it instead with a toasted pitta, which is clearly not traditional, given the vast distance between the middle east and south-east Asia, it has a texture almost reminiscent of a chapati, but is much easier to procure.

Start by chopping a head of broccoli into fine florets, discard the tough stalk and stir-fry them in a little vegetable oil until tender, add the cooked prawns and toss in the hot oil. Add the korma paste and stir until the prawns and the broccoli are coated. Add the double cream and stir until it is a uniform ochre tone. Add 250ml of water from a recently boiled kettle and season with salt and freshly ground black pepper. Simmer for 20 minutes stirring sporadically until the soup has thickened, and serve, with a freshly toasted wholewheat pitta.

ingredients

150g cooked king prawns
1 head broccoli
3 tablespoons korma paste
50ml double cream
salt & pepper

Monday, 1 August 2016

Banana Pancakes

Yes, I too was sceptical. These sound disgusting and bizarre, but believe it or not they do actually make something resembling pancakes in style and in taste. I was inspired to create this recipe when I saw on snapchat that my friend and colleague Zoe had made something similar, and they looked so good, so I made my own!


To start chop a banana roughly into a bowl, mash the banana using a fork until it is smooth and without chunks, whisk an egg and add it to the banana along with a teaspoonful of vanilla and half a teaspoon of baking powder. Mix together until smooth. At this point you can add pretty much anything you want, be it honey or chocolate chips or berries. You can also double up on the quantity if you wish to make a larger batch, the amount used here will make enough for one.

Heat a small knob of butter in a skillet or griddle, and then add a ladleful of batter when it is hot, cook it until the edges of the pancake start to frill and the top resembles set jelly, check that the bottom has browned, flip it over and cook the other side until brown and firm. Place on a hot plate and cook the rest of the batter, if you are cooking a large batch you can keep the pancakes warm in a low oven. Serve in a stack with syrup.

ingredients

1 banana
1 egg
1/2 teaspoon baking powder
1 teaspoon vanilla
butter

Saturday, 30 July 2016

Places to visit before you die: Bilbao

This little known town on the north coast of spain's basque region is oft overshadowed by the likes of Madrid or Barcelona, but this small city, nestled between San Sebastian and Santander is truly a gem in the heart of Spain's industrial north.


Founded during the 14th century, Bilbao was the birthplace of the spanish civil war, and at its peak was one of the largest in europe, after industry fell away, Bilbao reinvented itself as a centre of culture and art, with the founding of the Guggenheim Bilbao in 1997, the town flourished, becoming an architectural jewel.


I will admit that visiting the Guggenheim was my main reason for going to Bilbao, but I fell in love with this gloriously avant-garde city and it's pleasures. The historic center of the town is known as the Casco Viejo is a beautiful labyrinth of winding pedestrianised streets filled with tapas bars and restaurants. Our base during our visit was the Plaza Nueva, a neoclassical square surrounded by colonnades which conceal a covered walkway, hiding some of the best food I'd ever eaten. Food in Spain is casual and copious, and I very happily wolfed down a thick spanish frittata served with bacon, smoked ham or vegetables, or deep fried breaded cheese served as a sandwich.


Outside of the old town the 18th century buildings fall away, to reveal newer, more daring architecture. The metro system is designed by Norman Foster, and the glittering diamond in Bilbao's crown is the Guggenheim, a towering cathedral, monumenting modern art. The building, designed by Frank Gehry is a towering edifice carved out of metal arranged as scales, limestone and finally glass. The atrium of the museum is vertiginous and bold, stretching up over three stories, like a glass chimney, crooked in perfection.


The first room is a series of sweeping metal sculptures, designed to be walked through, though they shouldn't have been, they were a supremely emotional experience, and one I shan't be forgetting in a hurry. The other rooms oscillate between Louise Bourgeois' Cells, and Shadows, by Andy Warhol, displayed here for the first time in its entirely. Outside, are pieces from Jeff Koons Celebration series, the tulips made of glass to appear as giant balloon sculptures, and Puppy, a giant floral terrier.


Between old and new is the river, the guggenheim having been built on the ashes of the old port, what was previously polluted, has now been turned into a beautiful promenade, lined with flower markets and bridges. Bilbao is almost dichotomous in its glory, a beautiful combination of old and new, of the traditional and the radically progressive.


Thursday, 28 July 2016

Rosemary Focaccia

I lived in Milan for a year from 2008 to 2009, and one of the most wonderful things about Italy is focaccia, soft, golden and glistening with olive oil, focaccia in Italy comes topped with more toppings that your average pizza, and is essentially a meal in itself.


This recipe makes a glorious focaccia, and whilst it pales in comparison with the actual article, it's the best I have tasted on these shores. I have made a rosemary focaccia here, using fresh rosemary,but you can use any herb you like, thyme would work well also.

Start your dough by sifting and mixing together your dry ingredients. Finely chop your rosemary needles and add them to the dry ingredients, add a tablespoon of dried mixed herbs and some crushed black pepper to taste. Add your wet ingredients and mix with a fork until you have a stiff dough. Turn the dough out onto a floured surface, and knead for ten minutes until you have a smooth dough. Return to the bowl and cover with a tea towel, leave to rise for about an hour, or until doubled in size.

When the dough has risen, knock it back gently, and place it on a greased swiss roll tin, work the dough with your knuckles, stretching it until it covers the whole of the tin, don't worry about it being too uneven. Cover with clingfilm and leave again to rise for 30 minutes. Remove the clingfilm and top the dough with some rosemary leaves, sprinkle with sea salt flakes and add some crushed black pepper, finally drizzle the bread with olive oil and bake in the oven at 200C for about 40 minutes, or until cooked through and no longer doughy. Leave to cool slightly before eating.

ingredients

200g plain flour
1tsp salt
4g dried yeast
2tbsp olive oil
150ml water

3 rosemary branches
1tbsp dried mixed herbs
olive oil
salt & pepper

Monday, 25 July 2016

Avocado, Lemon and Spinach Linguine

This recipe was inspired by my friend Jason, who was recently soliloquizing on the virtues of serving pasta with avocado, with the addition of lemon and spinach. This is my version, and I have added basil, which adds a welcome piquancy. The importance with this recipe is to work fast, you can make the sauce while the pasta is cooking, and after the sauce is added to the pasta it needs to be served instantly, otherwise the avocado will cook, which is rather unpleasant.


To start put your pasta on to cook in boiling salted water. Peel and slice the avocado and place it in the blender, add a large glug of extra virgin olive oil, and a clove of garlic. Blitz with a small dash of salt and the juice of half a lemon. Add the leaves of a large sprig of basil and blitz again, check the seasoning, you may need to add more salt.

When the pasta is cooked, drain it and return it to the pan off the heat, and add a few handfuls of baby spinach leaves, stir until the spinach has wilted and then add the sauce, stirring quickly to combine. Grate over some lemon zest and serve.

ingredients

300g linguine
1 avocado
1 clove garlic
2 tbsps olive oil
1/2 lemon
50g spinach
large sprig basil

Sunday, 24 July 2016

Potato Korma

Part of what I love so intensely about indian cuisine, is their lack of fear at serving carbs with carbs with carbs. I adore carbs, as was illustrated recently when I ordered a jacket potato with a side of chips. My adoration of starch aside though a potato curry served with rice might sound a rather bizarre prospect, in all honestly it is wonderfully comforting.

I've added carrots to this recipe in addition to the traditional potatoes, and I've used a korma curry paste, making this more of a spiced dish than a spicy dish. This dish is also vegan, entirely accidentally, as I used coconut cream instead of dairy cream to make a lighter, less rich curry.

Start by prepping your veg, chop the potatoes and carrots into large chunks and place in a large heavy bottomed saucepan. Salt and cover with water and bring to the boil. Cook for 15 minutes until tender and drain. Put the saucepan back on the heat and add the korma paste. Stir with a wooden spoon to coat the vegetables in the paste, and add the coconut cream. Stir until the cream has combined with the paste and add a large dash of sea salt flakes and some crushed black pepper.

Turn down the heat and simmer the curry until it has reached your desired level of wetness. I enjoy my curries relatively dry. Serve on a bed of cooked brown rice.

Ingredients

250g small potatoes
2 large carrots
250ml coconut cream
2 tablespoons korma paste
salt & pepper

Saturday, 23 July 2016

Conchiglie alla Vodka

There are many theories about the origin of this dish. Some claim that the dish was created by a graduate of Columbia University, James Doty in the USA, others claim that it was first served at a restaurant in Bologna. It has also been claimed to be a roman concept, first created and served during the 1980's.


This may sound bizarre, but to be entirely honest, it doesn't exactly taste of vodka, but the alcohol brings out the flavour of the tomato, leading to a sauce that is rich, thick and smooth. Some recipes add the vodka straight to the sauce, I elect instead inspired by Nigella Lawson to toss the pasta in the vodka before adding the sauce.

Finely chop half an onion, and fry it in garlic oil sprinkled with salt until it has softened and is translucent. Add the can of chopped tomatoes to the frying pan, turn down the heat and simmer for 20 minutes until thick, add the double cream and stir until smooth. Meanwhile cook your pasta in boiling salted water according to the packet instructions. Toss the drained, cooked pasta with the vodka and the butter, and add the sauce. Stir to combine and serve, with a little grated parmesan.

ingredients

1/2 onion
garlic infused olive oil
salt
1 can chopped tomatoes
2 tablespoons double cream
300g conchiglie pasta
50ml vodka
2 tablespoons butter
parmesan cheese, to serve

Monday, 18 July 2016

Naan Pizza

When the craving for soft or crispy dough topped by tangy tomato and gloriously stringy cheese hits I find that it is often at an inconvenient hour. And given that I sadly don’t live in an urban area where pizza-by-the-slice is readily available even at the witching hour, I need to resort to other measures.


Making pizza at home is often fraught with problems, thick premade pizza bases are often doughy with an unpleasant chemical aftertaste, and fail entirely to replicate the italian heaven I so often crave. Ready rolled dough is also available, and though it is ultimately inoffensive in itself, conventional household ovens rarely get hot enough for the dough to crispen and brown, leaving an unfortunate soggy bottom. If your passion for pizza is so great that you have installed a wood fired pizza oven in your garden, and are willing to light it whenever the craving hits, then by all means use ready-rolled pizza dough.


For those of us without such dedication, Naan bread makes a fantastic substitute for pizza dough, it is already cooked, so these flatbread pizzas will cook in no time. I try to always have naan breads and a tin of tomatoes in my pantry, so as to be prepared whenever the craving hits. As for the rest of the ingredients, I have given an example here, but you can of course use whatever you have leftover in your fridge, this recipe is but a guide and an idea.


Start by spreading the naan bread with the tomato puree, drain the chopped tomatoes and top the naan with two tablespoons of the tomato. Roughly dice the courgette and fry it lightly in olive oil, and add this to the pizza.


Finally add the cheese, peel the mozzarella ball into thin leaves and strew them atop the naan, and finally top with grated cheese. Place in a hot oven straight onto the oven rack for about 3 minutes, or until the naan has crisped and the cheese has melted, and serve


Ingredients

1 Naan bread
2 tbsps tomato puree
1 can chopped tomatoes, drained
1 courgette
1 mozzarella ball
50g grated cheese

Sunday, 17 July 2016

Chicken Masala

I have named this dish Chicken Masala, as it doesn't follow any traditional curry recipe, nonetheless it is delicious and painfully simple to make, containing only six ingredients, one of which is pepper.


Instead of searing the chicken in a frying pan, I prefer to roast it in the oven first, which allows the chicken to be cooked from frozen, finally I have made this as a fairly dry curry, if you prefer a wet curry, then you can add more cream and simmer the sauce for less time.

Start by cooking the frozen chicken breasts, preheat the oven to 200C and brush the chicken with a little vegetable oil, bake for around 40 minutes or until cooked through.

Remove the chicken from the oven and allow to cool slightly. Meanwhile process half a peeled onion in a food processor until fine, and cook with a little oil in a deep saucepan until translucent and soft. Dice the chicken roughly and add to the saucepan, stirring until the chicken has browned slightly.

Add two and a half tablespoons of masala paste to the pan and combine so that the chicken is now coated in the curry paste. Cook for a few minutes and add the cream, stirring so that it has an even colour. Turn down the heat and allow the sauce to simmer until the sauce thickens and coats the chicken, add freshly ground pepper to taste. Serve on a bed of rice with a naan bread or poppadom.

ingredients

2 chicken breasts, frozen
vegetable oil
1/2 white onion, peeled
2 1/2 tablespoons masala curry paste
4 tablespoons cream
black pepper, to taste

Thursday, 14 July 2016

Sweetcorn Fritters

A tried and tested dish it's true, but these are slightly dissimilar to what you would expect, the ingredient list is almost embarrassingly short, comprising just 5 ingredients and they take almost no time to prepare.


When I made these for the first time, it was also the first time I had ever separated an egg, I've always had a firm conviction that any dish that involves the separation of six eggs, in which you only use the yolks, was a waste of time, I can justify posting this recipe because firstly, it only involves the separation of two eggs, and secondly because you use both the whites and the yolk.

Start by separating the eggs placing the whites in one bowl and the yolks in another. Whisk the whites until they are frothy and slightly stiff, and then beat the egg yolks with the flour, and fold them into the whites. Drain the can of corn and mix into the batter with a large dash of salt. Finally add a teaspoon of turmeric and half a teaspoon of paprika to the batter and mix. You may need to add more flour to the batter if it is too slack, it should be able to hang off a spoon without running straight off.

Heat a little oil in a griddle or heavy based frying pan and add the batter to the pan in large dollops, flattening the batter with a tablespoon. Cook on each side for a couple of minutes until they have lightly browned on each side. Serve stacked whilst still warm, with a little relish, or tomato ketchup on the side.

ingredients2 eggs3 tbsp plain flour250g sweet corn, drained1/2 tsp paprika1 tsp turmericoil, for frying

Tuesday, 12 July 2016

Rosemary Slab Cake

Now this might sound bizarre but bear with me, whilst I appreciate that the idea of using rosemary in baking might sound bizarre, in this instance it really works, and though the cake doesn’t exactly taste of rosemary, the herb adds a peppery piquancy that is entirely welcome.


Pay attention to the quantity of rosemary used here, I find that when used over zealously and when chopped too finely or even, heaven forbid, when ground finely can taste soapy. So although the quantity of rosemary used may seem scant, it is just enough to add a herbal zing without a carbolic tang.

Though the inspiration for this dish came in the form of a loaf cake, I prefer to make this as a slab cake, for a few reasons, firstly it is easier to cook through, and you’ll have no issues of doughy, raw centres, especially useful when your oven is being temperamental, as mine often is. Secondly it keeps better, and you can even freeze it, as this cake defrosts well. My mother recently introduced me to the slab cake, and I have become rather taken by the concept, so expect to see more on here in the future.

Preheat the oven to 170C and line a square slab tin. Cream the butter and the sugar, and then beat in the eggs each with a spoonful of flour. After this has combined add the rest of the flour and fold it in, adding the chopped rosemary. Scrape into the lined slab tin, sprinkle over the sugar and bake for 45-50 minutes, or until a skewer comes out clean. Leave to cool before removing from the tin.

ingredients
250g butter
200g brown sugar
3 eggs
210g self-raising flour
90g plain flour
2 tablespoons chopped rosemary leaves
4 tbsps milk approx

extra caster sugar

Tuesday, 10 May 2016

Kedgeree

Kedgeree began life in India as a dish of spiced rice and lentils. The dish is thought to have been brought back to britain by scottish regiments hankering for indian flavours, and, with fish, generally smoked haddock being used instead of lentils, the dish became a popular breakfast dish in a victorian england where anglo-indian cuisine was incredibly fashionable.

This kedgeree, inspired by a recipe I found in Feast is cooked like a risotto, this is partially because I particularly enjoy the sticky starchiness of a risotto, but also because it is the only way I know to properly cook rice. Though this is traditionally served for breakfast, the idea of cooking either fish or risotto before midday makes me feel queasy, and I prefer this as a simple supper instead.


Start by poaching your fish, place the smoked haddock fillets in a deep frying pan, and sprinkle with mixed herbs and pepper, cover with the water and bring to the boil, covering the pan with either a lid or some foil. Simmer for 3-5 minutes and remove from the heat. Remove the fish from the water with tongs and transfer the liquid into a measuring jug, top up with boiling water to a litre, add the stock cubes and stir to combine.

Wash and finely chop a leek and place half the butter and the oil into a large frying pan, heat to a medium heat and add the leek, cooking until it softens. Add the rice and turn it in the oil until the grains are soused and slick with the oil. Add the spices and the lemon zest and mix, start pouring in the stock and stirring, until the stock is absorbed before adding more, continue until all the stock is absorbed and the rice is tender.


Remove the skin from the haddock and flake the flesh with your fingers, add it to the rice and add the remaining butter and the juice of half a small lemon and stir to combine, serve, if wished, with a hard boiled egg.

ingredients

250g smoked haddock
500ml water
1 tsp ground pepper
1 tsb mixed herbs

1 leek
300g rice
2 stock cubes (or enough granules to make a litre of stock)
30g butter
1 tsp vegetable oil
1/2 tsp ground coriander
1/2 tsp ground cumin 
1 tsp ground turmeric
1 lemon

hard boiled egg, optional